Saturday, January 31, 2015

ISSE LB 2015 (International Salon and Spa Expo, Long Beach)

I got to go to the Long Beach hair show for the first time this year!

I gotta tell you, this show was INSANE. It is a much bigger expo than IMATS is. I was honestly overwhelmed by all there was to see, do, buy, and learn there.

I simply didn't know what to do first. Even if I had been there for all three days the expo was open, I wouldn't have been able to see and do everything they offered.

The actual room where the expo hall is held (brands, booths, exhibitors, shopping) is jaw-droppingly giant. I walked in and was overwhelmed with the amount of booths there were. 
 
I loved the atmosphere of this expo. There were beauty professionals just like me everywhere. I could feel the excitement and passion in the air.

Every corner I turned there was a different demo going on, or a celebrity hairstylist, or product giveaways. I just couldn't keep up, but boy was I in my happy zone. 
 
I tried to pick what my favorite part of this convention was, but I couldn't settle on just one favorite thing. I LOVED the hair/nails/skin/makeup products available for purchase, I LOVED the free education that was offered, and I LOVED the demos and shows!

This is definitely a great expo to go to if you're looking for inspiration. If you are a professional makeup artist, esthetician, nail artist, or hairstylist, you will be inspired by what you see.
Okay so enough ranting about how much I loved this convention and how much you would love it too.

Let's talk about what I did there!

Unfortunately I could only afford a one-day ticket there, and on top of that I arrived late, BUT I still managed to buy some awesome products for my kit and I attended one business class.

The class I attended was "But First, Let Me Take A Selfie: The Art & Science of Instagram with Larisa Love".

The entire class focused on the importance of social media in association with marketing and branding yourself to an audience/clientele. It was taught by Nina Kovner, with help from Larisa Love.

I absolutely loved everything about this class. I learned so much, but above all I was inspired. Nina and Larisa were both extremely down-to-earth and funny. They both shared their tips on how to build a brand and a following on instagram. They talked about the importance of building that online connection with your clientele. 

I can't fully describe how honored and grateful I was to be there.

Please take the time to follow Larisa @larisadoll and Nina @passionsquared on instagram. They are both such incredibly inspiring women.

You can also check out Larisa's blog at www.hairbylarisalove.com

Trust me, it'll be worth your time to follow these women.

Also, sorry for the fuzzy picture below. I had a hard time getting a good picture. Their class was jam PACKED with people that were trying to get in just to hear their wisdom.
 

~Haul Time~

Girl, you know I bought some stuff for my kit. The prices at professional shows like this are so much cheaper than what they would normally be sold for.

I needed more round brushes since I've been getting into blowouts lately. Plus, the handle on one of my old round brushes broke off, so I was definitely in need of some new tools. I bought this pack of three from the same makers as "The Wet Brush".
 
 I also snagged a sample of an Argan oil hair treatment. I haven't tried it yet but I'm sure it's awesome. If you guys read my post about short hair care,  http://brittkaye.blogspot.com/2014/12/how-to-care-for-short-hair.html , you would know how much I love using Argan oil for my hair.

I picked up some replacement razors for my hair razor too. I needed them, and when I saw them it was a no-brainer.

There was an area of the esthetics expo room that allowed attendees to donate a minimum of five dollars to charity, and in return they got to choose five sample-sized beauty products. I LOVE SAMPLES AND I LOVE CHARITY SO NATURALLY I JUMPED AT THE CHANCE.

I picked out a mini OPI nail polish, a color therapy styling oil (used on damp hair or mixed in with hair color for extra shine), Satin Smooth Renewal Facial Cream Cleanser, Satin Smooth Daily Moisturizer Broad-Spectrum SPF 30, and a facial scrubber for use in the shower.

I am in love with the Satin Smooth products I got. They both smell like pina coloda. I am so not exaggerating. They smell so good, just like coconut and pineapple. I also love the cleanser because it is super rich and doesn't foam. It is a cream cleanser that you work into your skin with warm water, and then rinse. The moisturizer is great because it has SPF 30, but it doesn't leave that whitish glow that a lot of sunscreen moisturizers leave. It also soaks right into my skin without leaving any sort of oily feel or residue.
 
And finally... definitely my favorite thing that I purchased at ISSE...

an Amika flat iron!

I've wanted one of these for so long. They are extremely versatile. You can use them to straighten, curl, or wave. 
 
I chose the peacock print, too. They come in all sorts of colors and styles. I am one of those goofy hairstylists that enjoys personalizing every part of my kit as much as possible. So, now I have a peacock flat iron. Even my blow dryer is bright teal and sparkly. Yup.
 

Wrapping it up, ISSE LB was a simply fantastic experience. I learned so much, got hecka inspired, and bought some rad tools.

ISSE is an expo only open to professionals. Unlike IMATS, you need professional criteria to attend.

Much love as always,

BKL 

Saturday, January 17, 2015

IMATS LA 2015 (International Makeup Artist Trade Show, Los Angeles)

FAIR WARNING. This blog post is one heck of a doosy. (I have no idea how to spell doosy.) Anyway, this post is going to cover a makeup tutorial, my day at IMATS, the people I met, AND my IMATS haul. I hope you're in for a ride! ;3

I'm going to start right off with a tutorial on the makeup I did for IMATS. 

This look is actually one of my favorites that I've ever done... and it is pretty damn simple.


Product List:
  • NARS radiant creamy concealer in "custard"
  • Laura Mercier loose translucent setting powder
  • an unnamed berry colored Sephora blush
  • Becca pressed highlighter in "opal"
  • Anastasia Beverly Hills dip brow pomade in "ebony" 
  • Stila eyeshadow single "kitten"
  • Tarte lights, camera, lashes mascara
  • Rosebud Perfume Co. Minted Rose lip balm
  • Sugarpill eyeshadows in "hysteric" (discontinued), "goldilux", "love+", and "flamepoint"
  • Becca Ultimate Creme Eyeliner in "Belle Epoque"
  • Urban Decay Heavy Metal liquid glitter eyeliner in "distortion"
  • unnamed brown and dark shimmery brown eyeshadows

  For the sake of simplifying this post, which is already going to be super duper long, I am not going to go over my foundation/blush/highlight/eyebrow routine for this look. It is the same as I did in the previous post. Instead I'll focus on my eyes and lips.

eyes:

My eyes were already primed with concealer and powdered. I started by using the Becca creme eyeliner with a Sephora angled brush. The eyeliner itself is really very pretty. It's a deep, dusty plum color, with a little bit of  iridescence to it. I lined upper lid with the liner, adding a small wing. If you make a mistake with this eyeliner, no worries! It is fairly easy to wipe off. I had to redo one of my wings because I was unhappy with how it came out. Yes, even makeup artists make mistakes. We're all inevitably human and makeup artistry goes along with practice and making mistakes. Don't get discouraged!

Once my perfectionist mind was satisfied with how my eyeliner looked, I dipped the same angled liner brush into Sugarpill "hysteric" loose eyeshadow and went over the Becca eyeliner with it. This added a brighter purple color and even more shimmer to the eyeliner. Finally, I took my Urban Decay liquid glitter eyeliner and went over the eyeliner yet again, adding lots of glitter.

I highlighted my brow bone with Stila "kitten" eyeshadow and used two brown eyeshadows to darken up my drop shadow. (under my eye)

Finally I finished off my eyes with mascara, starting on my lower lashes and then going onto my upper lashes.
 
 lips:

This looks hard, but it really isn't. All I did was put minted rose lip balm all over my bare lips, and then I used the same angled brush that I mentioned previously to fill in my lips with eyeshadow. Yes, eyeshadow on lips!

All of the eyeshadows I used for my lips are Sugarpill.

I started by filling in my whole mouth with "goldilux" loose eyeshadow. (remember, I used a Sephora angled brush for the application of eyeshadow)... Goldilux is a super gold, shiny eyeshadow. I then used "love+" to line my lips and darken the corners of my lips. Finally I used "flamepoint" to ombre out the red into the gold. I used Flamepoint to blend out from the red corners of my mouth towards the center. The left the very center of my lips purely gold. 

That's all I did! The best part about this is it is surprisingly long-lasting. I ate, drank, and talked with this look on my lips and it lasted all through IMATS and that night without one single touch up. Right after I applied my lips I took a sip out of my cup of iced tea and there was almost nothing left on the cup at all.
 
Tip: After you're done applying all of the eyeshadow on your lips, use your ring finger to blend and meld all of the colors together, especially the corners of your mouth.
 

DRUMROLL PLEASE...

IT'S THE MOMENT YOU'VE ALL BEEN WAITING FOR...

DUN DUN DUUUUUUUN! 

IMATS!
 
It was times like this that I really, really wished I had a better camera than just the one on my phone. I would've vlogged like crazy if I had the means to do so. Instead, I took as many pictures as I could on my smartphone and called it good. One day in the near future I will start making videos and putting them up on YouTube. Anyway, that's a whole 'nother story.

I took some pictures of the entrance to the convention both on the outside and inside. There was literally no line at all to get in, which is partially because I was a half hour late and partially because I went to pro night, which is for professionals only. (less people)

Normally on a regular IMATS non-pro day, the lines are pretty horrendous. 

I tried to take some pictures of how the expo hall looked so that my readers who haven't been to IMATS can get a sense for how it is. It is basically an enormous room with tons of booths. Each booth is a different vendor... mostly makeup brands of course.  

It was not nearly as crowded as last year, when I went on a non-pro day.
 
It goes without saying that I had to stop and take a selfie with the Sugarpill booth. 

IT'S JUST SO DAMN CUTE.

Besides, I freakin' love their makeup!
 
Besides the expo hall, which is where you do most of your shopping etc, there is another portion of the convention that is in a connected room.

The second room is still giant, but smaller than the expo hall. 

This area is where they have speakers, makeup displays (usually special effects makeup), and booths for makeup artistry schools. There is usually people doing special effects/prosthetic makeup demos on models in this area, too.

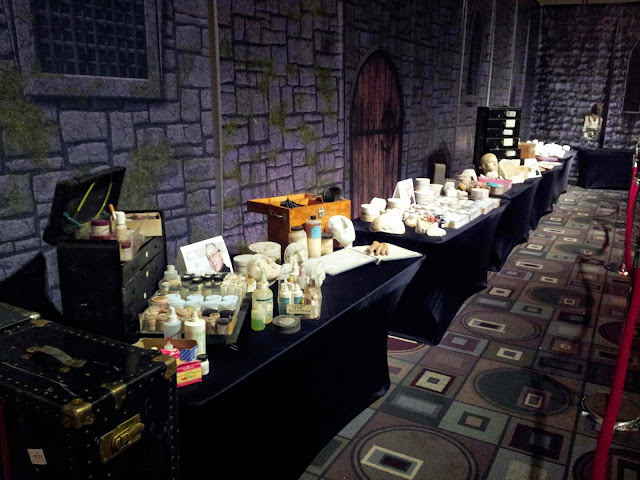
The picture below was a part of that room called the "makeup museum". It had tons of props, supplies, tools, casts, etc used for special effects makeup by the famous artist, Dick Smith. Everything seen in the picture was actually used by him on set when creating monsters.
He worked on films like The Exorcist and The Godfather.
  
I had to take a picture of this beastly bust, below. It was just too cool!
 

PEOPLE I MET


I'm now going to go into the people I had a chance to meet at IMATS. I the great thing about conventions like this is you get a chance to meet people you admire and look up to, even learn from them.

I had the opportunity to sit in during the second half of film makeup artist, Steve LaPorte, giving a lecture in the second room of the convention. Steve is another famous special effects makeup artist, known for his work on Beetlejuice, Edward Scissorhands, Terminator 2, How The Grinch Stole Christmas, Van Helsing, X-Men: First Class, and Pirates of the Caribbean: On Stranger Tides. 

That is quite the resume!

He was honestly such a nice man and I felt to blessed to get to listen in on his talk.

   
As he was speaking I wrote as many notes as I could. All I had was a very small mini notebook in my bag, but I made it work. Some of the most important things I took away from his talk were as follows:

  • Take 14 minutes every day to calm your mind and think. Even if that means waking up 15 minutes early when you have to be on set at 4 am. He told us how important it is to take a moment like that every day to calm and recharge our minds, and get ready for the long day of work ahead.
  • Being potentially successful as a makeup artist is only a little bit based on your skill, a lot based on your experience, and completely based on you communication skills. It is more important to start out in this field with strong communication skills than it is to start out with more technical makeup skills.
  • Don't touch an actor when the director is talking to him or her. Wait until the director is done speaking to start working on the actor again. He told us that from personal experience, directors can get snappy sometimes and it is best to not get in the way when they are talking to their actors.
  • Steve also talked about the importance of treating actors just like any other human, or even a friend for that matter. "We are in the people business," he said. He talked about how it is best to treat the actors with a kind heart, even if they themselves are crabby from a hard day. Embrace them as people and working with them will be much easier.
That was most of what I got from his speech. He was truly inspiring and had a great sense of humor about the way he talked to us. He seemed like such a sweet man.

 I got to meet Ve Neill!

Ve was a key makeup artist on movies like The Hunger Games, The Host, Beetlejuice, and Mrs. Doubtfire.

She is also a judge on Face Off.

She was a really sweet woman and I loved that pop of maroon she had in her hair!  

LAST BUT DEFINITELY NOT LEAST:

I met Shrinkle, AKA Amy Doan, founder and owner of Sugarpill Cosmetics. 

Amy is a very huge inspiration and role model for me.

First of all, she is so damn cute and kawaii. I am seriously in love with her style and sense of fashion. She also is soooo good at doing her makeup. She always uses Sugarpill eyeshadows in her makeup routine somehow and all of her looks turn out so bright and colorful! (not to mention does eyelashes doe)

She is also vegan and hikes all the time in the Los Angeles area. She owns her own makeup line!

There are so many reasons I look up to her.

Her boyfriend also happens to be a prominent Drag Queen and tattoo artist. Yup, she's mah role model.

Also, did I mention that she said she liked my lips? She didn't even know that I had used all Sugarpill eyeshadows to achieve the look but she liked my lips, so that's good enough for me. ^_^  

Follow Amy on instagram @shrinkle


I thought I'd throw this pic in of my hand covered in swatches of Sugarpill eyeshadows, of course.
 
Besides the three amazing people I mentioned above, I also saw my makeup artist friends, Jacqueline (@makeupbyjacqie on instagram) and Tricia (@tricialeighmakeupartist on instagram) while I was roaming the expo hall! Go check them out. They're both amazing artists. 

HAUL TIME!

So, I took a generalized picture of everything I got at IMATS including pamphlets, papers, badges, products, samples... etc
 
Sigma brushes was kind enough to give me a free travel-sized smudge brush shown below. 

At the Morphe brushes booth I ended up buying a plain white single eyeshadow for my Z palette at home and two new brushes. I bought an eyeshadow blending brush (shown on the right) and a denser, flat eyeshadow brush (shown on the left) for packing color onto the lid.

The blending brush is so incredibly soft. 
You probably could've guessed it, but I couldn't leave IMATS without buying some Sugarpill eyeshadows. Sugarpill released nine new eyeshadows on Friday, the day I was at IMATS. I got to swatch them all and after much debate I finally settled on buying Penelope and Charmy, which are both new Sugarpill shades. Penelope is a bronze coppery color with lots of shimmer, and Charmy is a peachy pastel color with light, delicate shimmer. 
I will make sure to mention in a future post what I thought of the new brushes and eyeshadows I bought!

Much love!

BKL 

Wednesday, January 14, 2015

Sunset Eyes Makeup Tutorial


ALRIGHT. LET'S DO DIS.

I got some new Sugarpill eyeshadows, and of course, I instantaneously had to try them out and play with them. Sugarpill is a wonderful brand. If you haven't used their products, I really recommend you try them out. All of their eyeshadows are cruelty free and a lot are vegan. Sugarpill specializes in bright, vivid, pigmented, and shimmery eyeshadows... definitely worth a try!

product list: 

  • NARS radiant creamy concealer in "custard"
  • Laura Mercier translucent loose setting powder
  • a pink unnamed blush
  • Becca pressed highlighting powder in "Opal" (my favorite)
  • Anastasia Beverly Hills brow pomade in "ebony"
  • Bite Beauty matte creme lip crayon in "clementine" (limited edition shade)
  • NYX lip liner pencil in "852 pumpkin"
  • Tarte lights, camera, lashes mascara
  • Stila eyeshadow in "kitten"
  • Sugarpill pressed eyeshadows in "buttercupcake" "flamepoint" and "love+"
  • Elaina Badro and Sephora brushes
 

Now that you know the products I used, let's get on to the how-to!

steps:

  1. Foundation. Surprisingly enough, I used no foundation at all for this look. Any and all of the coverage that I got came from the NARS radiant creamy concealer. I start by dabbing it on any spots I have on my face and under my eyes, where my dark circles are. I then blend with my finger. After those problem areas are taken care of, I dot the concealer all over my face, focusing on areas where I have redness. (like my nose, and lips etc) I then bleeeeend it out with my ring finger. I really love using this concealer as my "foundation" because it is so light on my skin, provides medium, buildable coverage, and it has a natural finish. After I'm satisfied with the coverage, I set it with the Laura Mercier powder. I lightly dust the powder all over, but I focus it on my undereyes and anywhere I know I get greasy easily, like my T zone.
  2. Blush and Highlight. I chose a pink blush because I think pink went so well with the colors that were on my eyes. If I had chosen a blush that was too warm it would have been way too many super warm colors on my face. So, I chose a pink instead of an peachy blush. For my face shape (oval/heart) I put my blush along the length of my cheeks back to my temples, and not so much on the apples of my cheeks. This is especially nice because I chose not to use any contour in the look and lengthening my blush like this helps accentuate my bone structure. After I am happy with my blush, I sweep the Becca highlighter onto the tops of my cheekbones and up and around over my temples and just over my eyebrow. This is the classic "C" shape of highlighting. After I highlight, I go back in with my blush and finish off my cheeks one last time.
  3. Eyebrows. I use a Sephora eyebrow brush in this case. It's an angled natural bristle brush. Remember when using ABH dip brow that a little goes a long way. I also have very naturally thick eyebrows and I don't need a ton of product to fill them in. Even so, it is easy to overdo it. When I pick up product onto my brush I barely tap the end of the bristles into the dip brow. This is usually enough to do one whole eyebrow. I always start with the outer points of my brows, because this is where I want most of the product to go. I darken and define the outer corners, and then use what is left on my brush to lightly fill in the inner portions of my eyebrows.
  4. Eyes. My lids were primed with the same NARS concealer and then powdered with the Laura Mercier powder. I started with highlighting my brow bone just under my eyebrows with Stila "kitten". I blended that down from my brow to just above my crease. I then pressed "love+" onto my lid, then blending up just barely into the crease. I used "flamepoint" as my transition color. I blended flamepoint into my crease and upwards just barely. Finally, I took "buttercupcake" and blended it between flamepoint and kitten. After that I went back with love+ and brightened up my lid. I then moved onto the drop shadow. (which is the lower lid, under the eye) I used an Elaina Badro pencil eyeshadow brush to put a fair amount of buttercupcake underneath my entire eye and around, matching up to the shadow I had on my lid. I then took flamepoint and did the same thing, but with only a thinner amount of it under my eye. (I am creating a sort of ombre effect, just like I did with the top of my eye.) Finally, I dampened a Sephora angled liner brush and picked up some pigment from love+. I used this to line just under my lower lashes. I finished off my eyes by using Tarte mascara starting on my lower lashes and then going over my upper lashes twice. No falsies were used this time.
  5. Lips. I lined my lips with the NYX liner, going just barely outside of my natural line. I then use the bite lip crayon, blending with my finger.
I would like to make a note about color theory here.

I have green eyes. Do you notice how much they stand out with the colors I chose?

When choosing an eyeshadow, if your goal is to make the natural color of your eyes pop, using the complimentary color of them will definitely do that. 

green eyes: the complimentary color to green is red. This is why my eyes are popping so much next to my love+ eyeshadow. If your eyes are more of a blue-green, then a deep, burnt red-orange compliments best. If your eyes are more of a light, yellow-green, deep red-purples look best. Now, not everyone with green eyes will want to wear red eyeshadow, so a good replacement color is purple. Purples and maroons look stunning on anyone with green eyes, because they have enough of that red tint in them that they still make green pop.

brown eyes: Brown is technically the result of mixing all colors together, and it is a neutral color. Therefore, there is no complimentary color for brown. However, there are some colors that still go great with brown eyes, depending on the kind of brown your eyes are. If your eyes are more hazel... (say, they have a little bit of green or yellow in them) purples do a fine job. If your eyes are an amber or light brown color, dark neutral colors will really make your eyes pop. If your eyes are dark brown or almost black, light, bronze, and neutral colors look best. Even tones of pink/taupey colors look good on really dark brown eyes. I also LOVE gray tones on any shades of brown eyes. Gray is also a neutral color, like brown. So, the key to making your eyes pop is using the right shades of gray for your eyes. Light brown and amber eyes look almost like they are glowing when they are set against deep, dark, steely, smokey grays. Dark brown eyes pop with lighter grays, ashy neutral tones, and silvers.

blue eyes: The complimentary color to blue is orange. If your eyes are a very dark blue, almost purplely blue, a light, yellowy orange looks best. If your eyes are closer to blue-green, dark, deep burnt red-orange looks best. I realize that most people with blue eyes won't necessarily want to wear orange eyeshadow. Purple, blue, and browns are beautiful substitutions. (Gray is beautiful too.) I think blue eyes are the most versatile when it comes to what colors you can wear on your eyes. I personally like super bronzy smokey eyes on blue-eyed people. A dark navy eyeliner compliments blue eyes very well. Purple has just enough warmth in it that is also acts as a great compliment to blue eyes.

If you find this confusing, I don't blame you. Here's a simple trick to picking eyeshadow that will look good on any eye color: A natural, neutral eye looks good on anyone. Put a base vanilla color, and contour with a light brown in your crease. Done. Secondly, if you noticed, purple was mentioned for all three eye colors above. Purple is extremely versatile and can be used for a pop of color and to accentuate any eye color, especially if it is done subtly.
There you have it!

Please do not hesitate to ask if you have any questions.

Viva la Sugarpill!

BKL
 

Tuesday, January 6, 2015

Places to Check Out: VeggieGrill


I finally got a chance to check out VeggieGrill! 

I was running some errands in Hollywood earlier today and I thought it was the perfect opportunity to try VeggieGrill, especially since there was one close by and I've always wanted to try it. 

VeggieGrill is a 100% vegan restaurant. 

They are actually a chain of restaurants. There are quite a few in the Los Angeles area, which makes sense to me because there is such a high volume of vegetarians and vegans living here.

So, here is my experience:

The style of the restaurant is very similar to the layout of a Chipotle. The three main differences being that VeggieGrill is fully vegan, they don't assemble the food in front of you like Chipotle does, and VeggieGrill has a wider variety of foods. They have some Mexican food...as well as American, Italian, rustic dishes etc. 

I looked at the menu while I waited in line. After taking quite a while to choose what I wanted to eat, I decided upon the "Crispy Chickin Plate". It goes without saying that the "chickin" was not really chicken. The entree was supposed to be the vegan version of a country plate of fried chicken, mashed potatoes, gravy, and greens.

The fried chicken is replaced with vegan chicken, the mashed potatoes are a healthy combination of potato and cauliflower, the gravy is a mushroom gravy, and the greens are kale!

All in all I have to say that I was pleasantly surprised by how much I loved my meal. My only complaint would probably have to be that it was just a little bland. It was also a TON of food! I didn't finish it and took the rest home to eat later.

Have you guys tried any vegan/vegetarian restaurants? Let me know if you try VeggieGrill and what you thought!

BKL


Sunday, January 4, 2015

Some People Make Resolutions...

...and I make one year and five year plans...

Seriously, I have a problem. Well, I guess you could say it's both a really good habit and a really bad habit. I make lists and plans and schedules and notes for EVERYTHING.

On one hand it really helps me remember things, stay focused, and actually get shit done. On the other hand it makes me nervous because I can actually see all of the things I need to do and still haven't done. It's just the teeniest bit nerve-wracking.

But, nevertheless, if I didn't write these lists like this I also wouldn't be able to sleep at night. I would just stay awake, hopelessly thinking about all of these things swirling around in my head. Instead if I find that I can't sleep because too much is on my mind, I get out of bed and write it all down.

Now, onto my plans.

On the paper below I wrote my important dates for January, my 2015 plan, my five-year plan, and my monthly budget. 

I won't go into everything on the paper because that would become tedious and it's unnecessary.
  
2015 goals:
   
  • Become fully vegan: I have been vegetarian for almost two years now, and the longer I go on without making the plunge to vegan the more unhappy I become. So, I want to finally make that switch over to full veganism this year. It will take a lot of money and determination, but it's worth the happiness and peace it will bring me.
  • Get fit and work out more: Okay so I know this is something almost everyone says they will do at the beginning of every year, but I truly want to do this. This isn't a wish for me, it's something that will happen, and something I've already been working on. I've already lost about 5 pounds (yes, even through the holiday feasts) and I don't plan on stopping any time soon. I've been walking more, doing yoga, hooping, hiking, and eating better. I plan to carry that into 2015.
  • Blog and Vlog: I want to continue blogging! My life is going to be crazy busy this year but I want to write at the very least one blog post a month... and continuing on that note, I want to start vlogging. Yes, people, YouTube. I want to start making YouTube content. I don't care if that means only one video up this year, I just want to start.
  • Work and Career: This year is going to be huge for me career-wise. Last month I finally got my cosmetology license and I am working on getting an assistant job in a salon in Hollywood. I want to really put everything I've got into furthering my career. I want to work full time. I want to continue working with Mikaela Phillips on her photoshoots. This year is really going to be a game-changer for me and my career. 
  • Conventions galore: This is going to be the year of conventions for me! I've already attended quite a few conventions in my lifetime, but I want this year to be full of them. I am going to make every effort I can to attend as many as possible. I want to do this partially because it's fun, and partially because conventions are a huge platform for education in my career field. I plan on attending IMATS LA, ISSE Long Beach, The Makeup Show LA, VidCon, BeautyCon, PHAMExpo, ScareLA, and any other cons I can get my hands on. 
Five-Year Goals:

  •  MUD master's program: Unfortunately I will not be able to attend MUD this February like I had hoped. I will simply not have enough time to devote 5 days out of 7 to school. I just can't make it work, even if I only worked part time. So, instead I have moved the MUD program to my 5 year plan. I still have every intent on going to the master's program there, I'm just unsure of exactly when I'll be able to do it.
  • Living on my own: Every young adult's dream: I want to move out! This is in no way an expression of any sort of disdain for my family, please understand. It's just that I'm a twenty year old young woman who can't wait to be independent! Anyway, I plan on being out and on my own by 2020.
    I'll probably be living in a studio apartment somewhere in LA. I love the Hollywood/Los Feliz area. Of course, I make this a part of my five year plan because it will take at least a couple of years before I can even begin to afford living on my own in LA. For now, I am happy living in LA with my father. 
  • Career: By 2020 I want to own a salon suite. For those of you who don't know what that is, it is basically a huge apartment-like building that houses many, many individual, small salons. Imagine an apartment complex where each apartment is a different, mini salon. Each beauty professional rents his or her own space, and is completely in charge of their business. That is where I want to be with my career in five years. Oh, and working on movies/photoshoots/editorials/TV wouldn't hurt either.
 THERE YOU HAVE IT.

Have a lovely 2015!

BKL


j